How to add & set up WP-Appbox plugin on the WordPress website post?

If you write a review of any application on your website or tell about an application and you want the link to that application to look like a professional look on your website, then you can create an Appbox on your WordPress website’s post which will display some information about the application like its Name, Logo, App Rating, QR Code and the installation link. All these things you can do with only one plugin named WP-Appbox.
You have to install a plugin named WP-Appbox with the help of this plugin you can easily add the official app store link of any application on your website, which will make it easier for people to access that application and your visitors to download or install any app. The name of that app will not have to be searched in the official app store and their time will also be saved.
Table of Contents
What is WP-Appbox?
WP-Appbox is a kind of WordPress plugin with the help of which you can display any official app store’s application on your website’s post, with the help of which users can automatically redirect when he clicks on it from your post to the official app store of that application for downloading or installing purpose.
WP-Appbox supports lots of app stores like Amazon App, (Mac) App Store, Chrome Web Store, F-Droid, Firefox Add-ons, GOG.com, Google Play Apps, Opera Add-ons, Steam, Snapcraft, and Microsoft Store, etc.
How to install the WP-Appbox plugin on a WordPress website?
Follow the below steps to easily install the WP-Appbox Plugin on your WordPress site.
Step 1
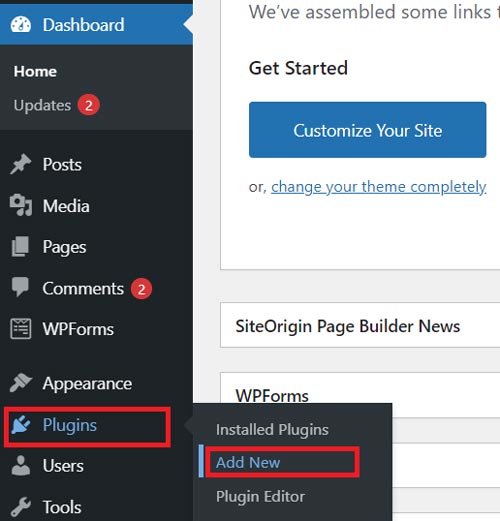
Open Dashboard of your WordPress website, go to the “Plugins” option, and select the “Add New” option for adding a new plugin to your site.
Step 2
Now Search the “WP-Appbox” keyword in the search bar option and then you will get to see the WP Appbox plugin, here you have to install and activate this plugin for your site.

Step 3
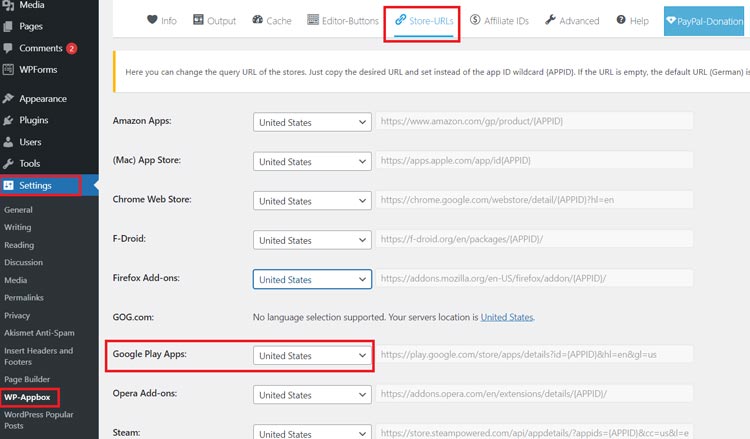
After activating this plugin you have to do some setting like if you want to show or display any Google Play Store app then you have to change the “Store-URLs” setting, here you will get to see the default App Store URLs will be set for Germany, here you have to change the location from Germany to the United States that’s it.
For doing this you have to go to “Settings” select the “WP-Appbox” and then select the “Store-URLs” and now change the location and for save these all changes you have to click on the “Save Changes” button, just scroll down to see the option. (see image)
Note:
If you want to change the WP-Appbox appearance on your post, then simply go to the WP-Appbox settings and select the “Output” option on the top bar, and in the Standard App-badge option, you can choose any one theme which you like.
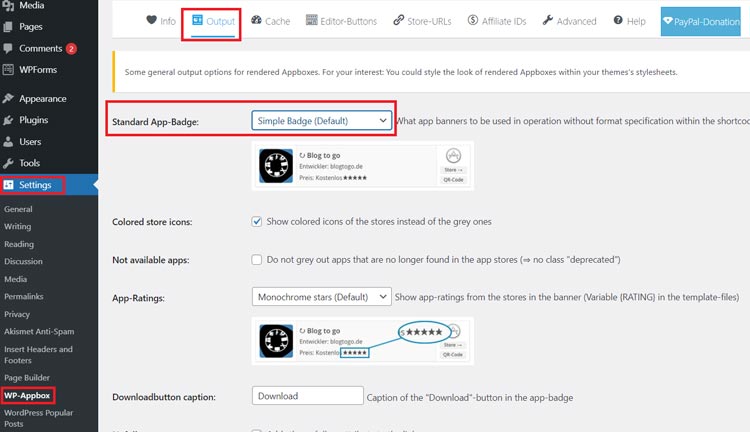
Here you will get to see four different theme options of WP-Appbox:
- Simple Badge (Default)
- Screenshots
- Screenshots Only
- Compact Badge
How to add WP-Appbox on the WordPress post?
If you want to display the app on your post using WP-Appbox plugin then you have to use “shortcodes” so that when you published that post then you will get to see the output of it.
Here is the way how you can use this plugin on your post
First of all, Open that post in which you want to add the WP-Appbox feature for displaying an app from the google play store so you have to use these shortcodes. A shortcode always closed with a capital bracket ([ ]) and all the code will enter within a capital bracket.
For example:
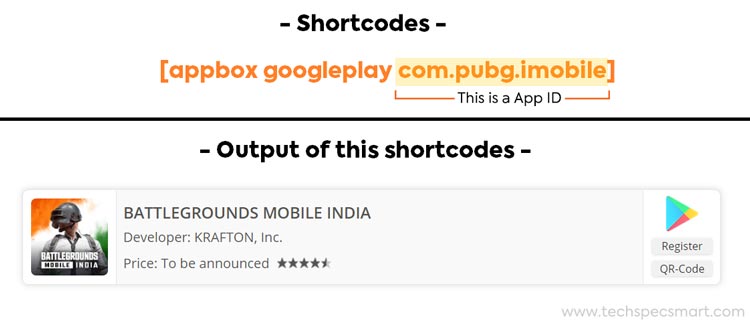
You have to use these shortcodes as a paragraph on your post and here only you have to change the App ID to display different apps.
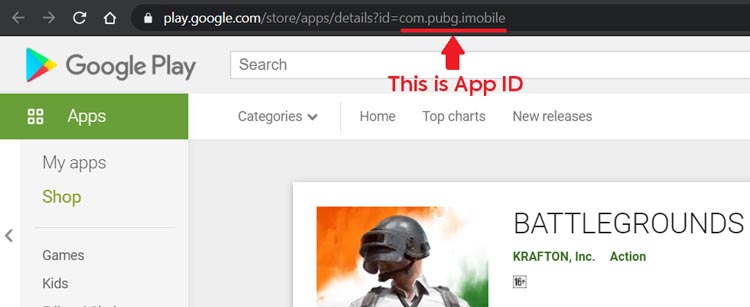
All App IDs start in this manner “com.example.name” in Google play store URL. You can easily find any App ID in the URL of that application (see in the below image for example).
Also Read | How to Remove the Date from WordPress URLs?

